« June 2010 | Main | November 2010 »

October 29, 2010

E92 M3 Project Part 5, Suspension

Regular readers of this blog know we're all about balance at VRPerformance; and if you've been following the E92 M3 project build you might have asked why all the power upgrades alone? Well, you are premature with that jaundiced eye, since suspension upgrades were part of the plan since day one.

When it comes to suspension engineering, our favorite go to manufacturer-- especially for all things BMW-- is TC Kline Racing. They have been building coil-over suspension kits for the 3 Series since the days of the E30. The quality of their house made components is top notch, and their collaboration with Koni for the custom tuned dampers makes for a package that offers superior ride and handling when compared not only to the stock set-up but also competitive brands. We've detailed the E46 M3 kit here, now it's on to the E9x series.

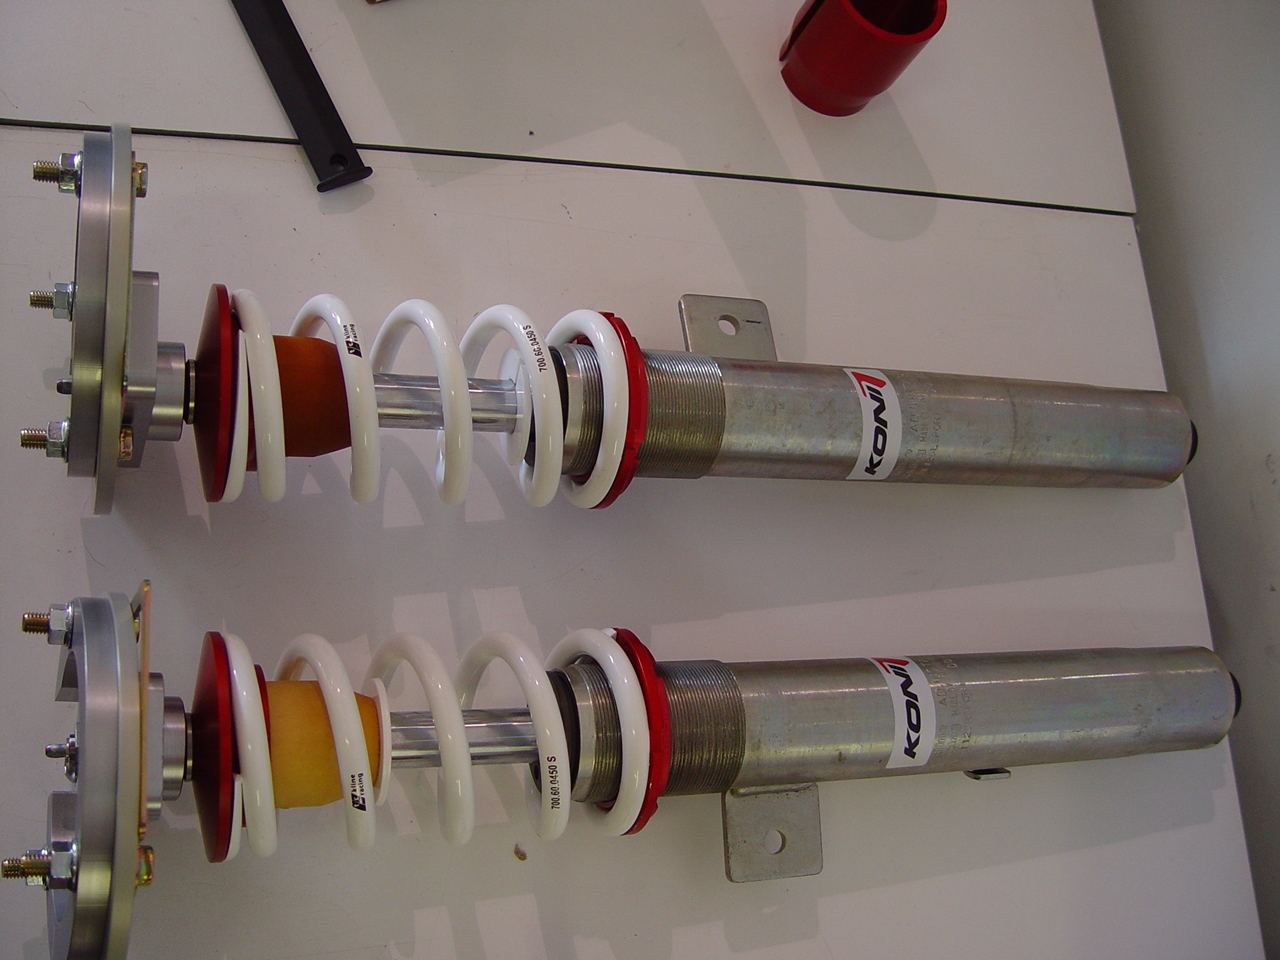
We chose TC Kline's "smart design double adjustable" coil-over system for this project which means both damper compression and rebound can be adjusted. This offers the greatest amount of flexibility to the end user.

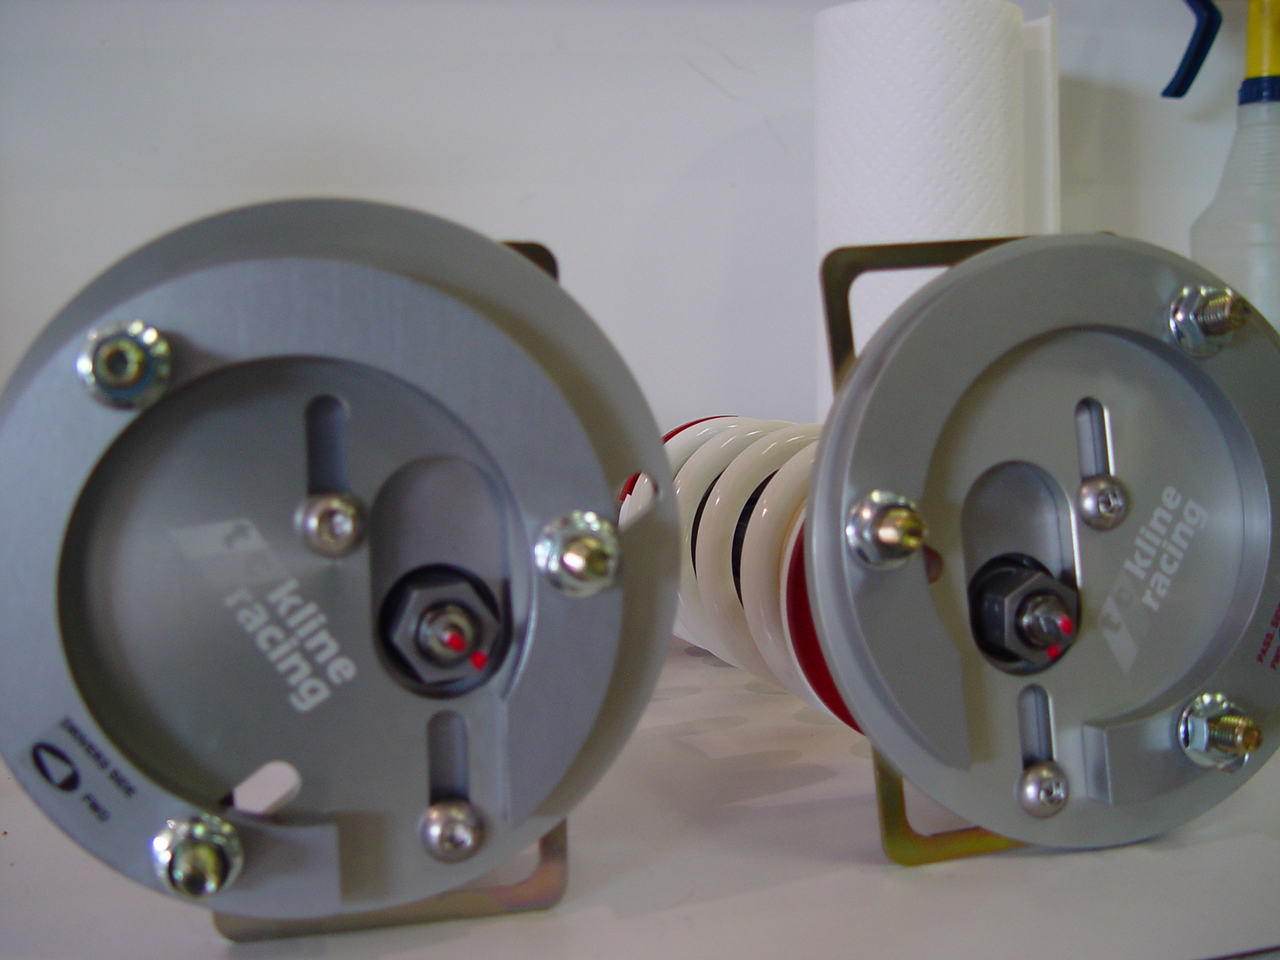
Here you see the front struts pre-assembled and ready for install. At the top are TC Kline's adjustable camber and caster plates.

DSC01909.JPG

The camber/caster plates are perfect for the owner who likes to take his street car to the track. Most cars like quite a bit more negative camber at the track than on the street, which these plates allow you to dial in. According to TC Kline:

"Our camber plates assure you of significantly improved turn-in and will not harm ride comfort. They feature lightweight, durable, aluminum alloy construction, highly protective anodized coating and a spherical ball joint, (replaceable), offer crisper, quicker steering feel. We have incorporated a “load ring” into the top of the camber plate to reduce stress on the sheet metal in the strut tower of the car."

DSC01908.JPG

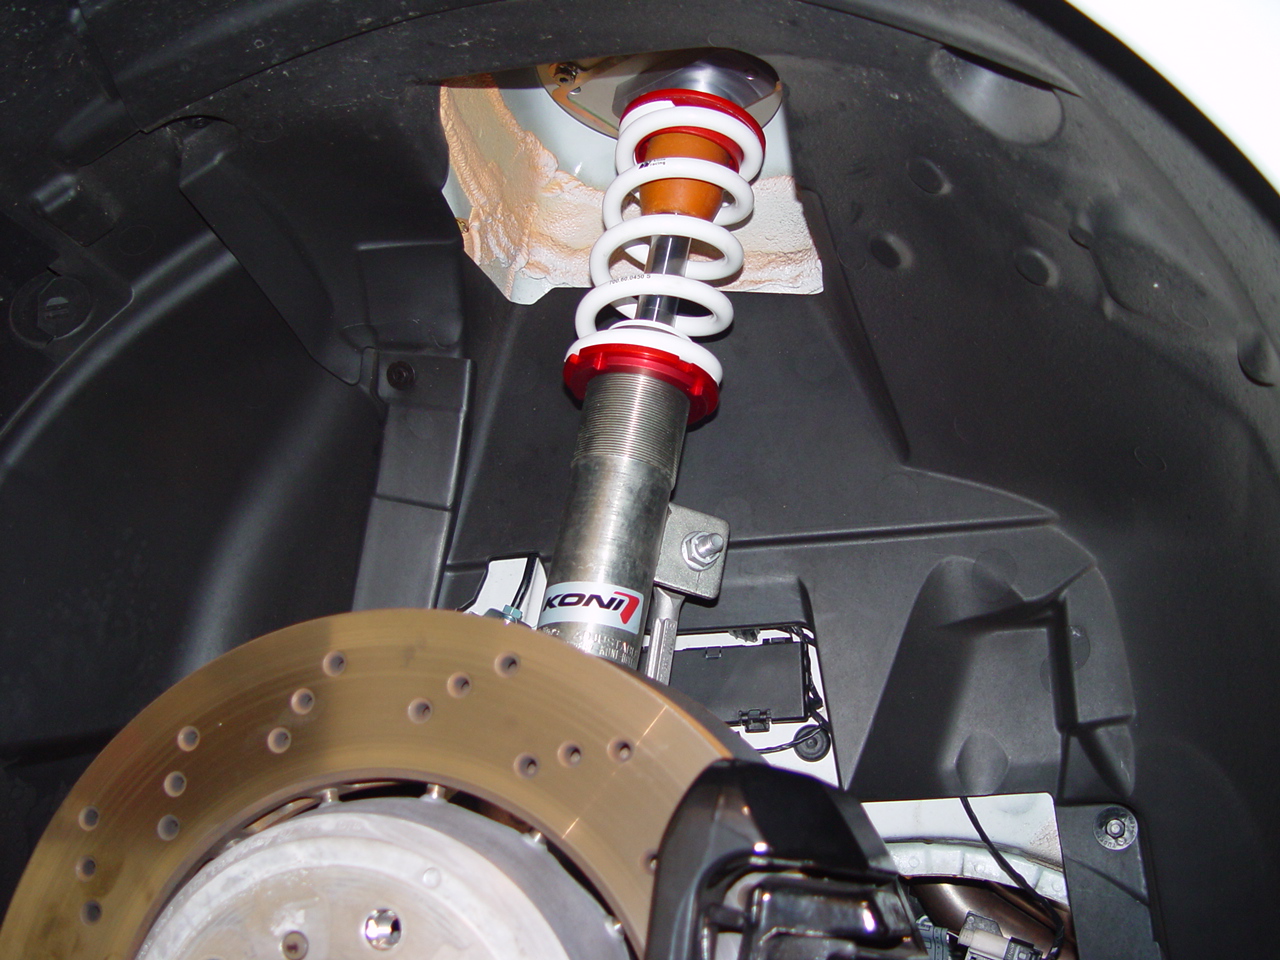
Here you see the front struts installed:

DSC01913.JPG

The rear suspension is a multi-link set-up so the coil springs and dampers are separate. The silver tube is the damper (shock absorber). Note the height adjustment perch on top of the coil spring:

DSC01916.JPG

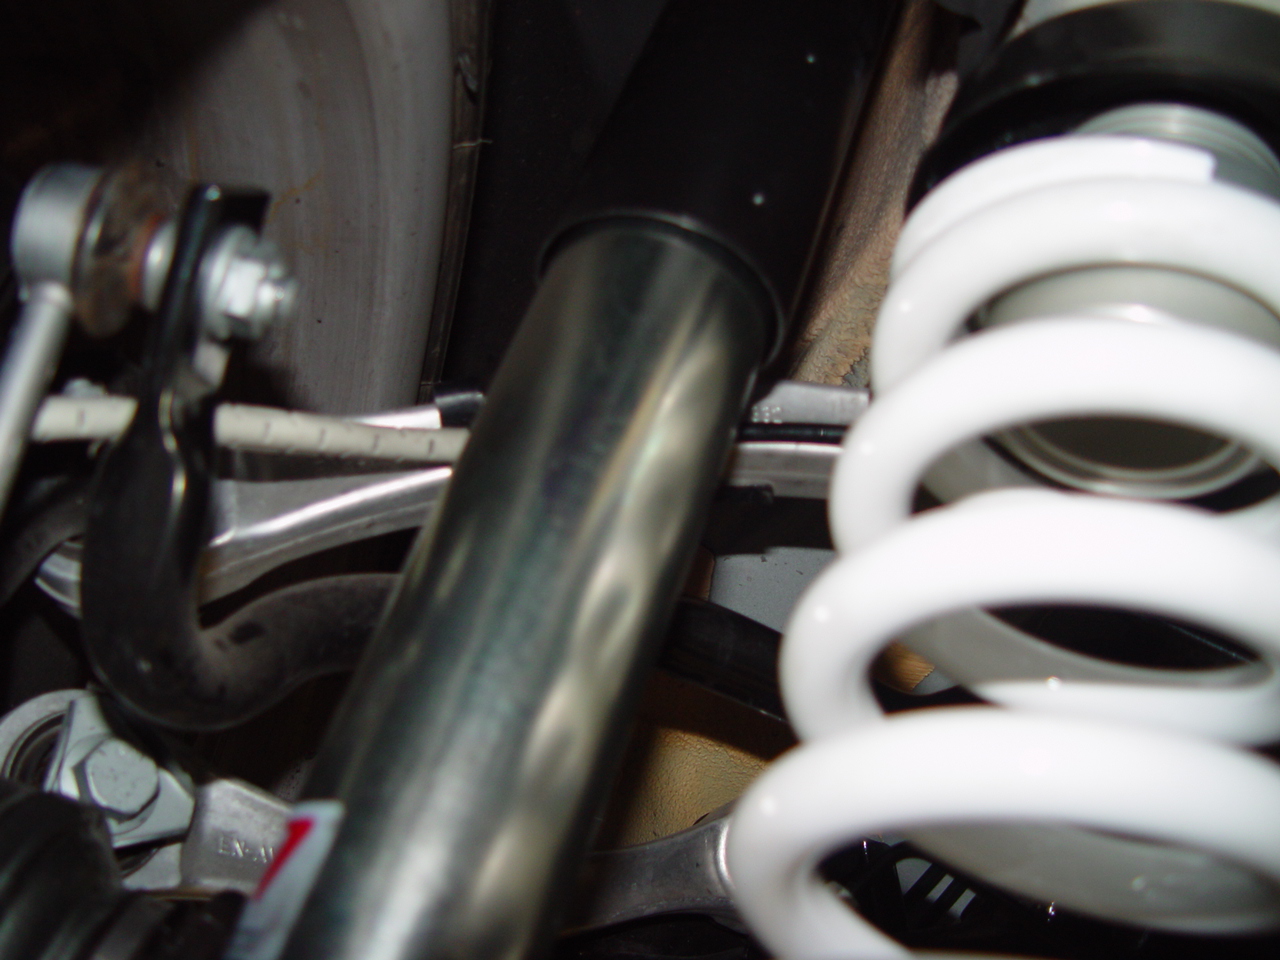
According to the manufacturer:

"Proven on the street and track, this system is unmatched by any other system on the market. TC Kline’s unique Smart Shock technology mated with our VVS alloy springs make this ride height adjustable kit the most versatile available. Incorporating separate external compression and rebound adjusters, the shocks can be dialed from street comfort to a full race setup in minutes. These features combined with our complete selection of VVS alloy spring rates make this kit the uncompromising choice for both street comfort and track performance. The Smart Design System is perfect for driving school enthusiasts, autocrossers, club racers, and serious pro racers alike"

Height adjustability is an important feature of the suspension not only for lowering the car, but also for corner balancing.

A proper alignment is equally important after such a major suspension upgrade. We typically set M3s up with zero front toe, mild toe in at the rear; negative 1.5 degrees camber front and negative 1 to 1.5 degree at the rear for the street. At the track, using the easy adjustability of the front camber plates, we recommend at least 2.5 to 3.0 degrees of negative camber. Thanks to the geometry of the M3 suspension, "adding" negative camber at the front also adds toe out-- and starting from zero, that's exactly what you want for the track. The camber delta between front and rear is then also optimal for the track. Damper settings really depend on the track, the weather and driving style-- looseness, over and under steer can all be tweaked by changing the damper settings.

E92 M3 Project Part 4, Engine Tuning

Advances in electrical engineering have allowed the venerable internal combustion engine to stay relevant in an increasingly hostile environment. A myriad of computer controls actuate precision crafted mechanical components in order to increase the efficiency and cleanliness of modern engines and the S65 is no exception. Since we’ve replaced some major engine components on our customer's E92 M3 in search of power, we needed to let the brain that controls it all "in" on our secret...

DSC01860.JPG

As described in Part 1 of this series, the engine is basically a large air pump. We've increased the flow of the air through the engine by swapping out the intake and exhaust. To best utilize these mechanical changes we need to update the "computer program" that runs the engine.

There are many companies out there that promise large increases in power from their programs, but few have the broad experience and engineering prowess of Powerchip. We've found their claims to be more conservative but more accurate. Also, peak power is one thing; a strong power curve that is useful everyday is another. And that's where expertise through years of experience plays a major roll.

According to Powerchip:

"In standard form, the BMW M3 4.0 V8 E92 produces 414 hp, however the addition of a PowerchipGold 93 will increase the power to 442 hp. In addition to the extra power, the torque is also increased. The M3 4.0 V8 E92 produces 295 lb.-ft standard, and this is increased to 315 lb.-ft. This means more pulling power especially up hills."

We worked with Powerchip's technicians to create a performance program specifically for this project vehicle, taking into account the modifications we made.

Next up, the suspension…

E92 M3 Project Part 3, Underdrive Pulley

There are many ways to increase the power output of your engine to make you car go faster. Conversely, there are also ways to use less power to make you car go faster. It's all about how the power is utilized. The engine not only drives the wheels, but it also powers accessories that do nothing to motivate the car (they run the AC, power the lights, and pump fluids to the steering rack). This is often called parasitic loss. Reduce the drag and use less power to drive the accessories; you have more power left over to motivate the car. Enter the “underdrive” pulley...

DSC01813 (2).JPG

By changing the diameter of the crank pulley, which drives all the other pulleys, you're mathematically changing the ratios-- it's like shifting gears.

We went with Turner Motorsport's custom pulley for the S65 engine in the E92 M3. According to Turner:

"The Power Pulley reduces rotational mass and safely under drives your belt driven auxiliaries for reduced parasitic power loss... We've found this pulley alone adds 10 to 14 HP and 7 to 9 Ft/lbs Torque on a stock M3 with no other modifications"

Installation requires a good bit of disassembly. Since we were also changing out the stock intake (see Part 1) we combined tasks, reduced labor hours for our customer and changed the pulley at the same time. Here you see the stock airbox removed:

DSC01810 (2).JPG

Next we had to remove the electric radiator fan and the various shrouds surrounding it in order to access the front of the engine where the pulleys are located:

DSC01811.JPG

Once the surrounding components are out of the way, the pulley is relatively easy to get to. The key to the installation is using proper torques and "Loctite" on the bolts holding the pulley to the crank, and remembering how the belts are routed.

DSC01812.JPG

Next up, engine tuning...

October 27, 2010

E92 M3 Project Part 2, Exhaust

Obsession. Obsession alone can be a bad thing when life and limb become irrelevant to the end goal. Obsession to craftsmanship on the other hand can be very good indeed. Quality is an ideal we obsess over at VRPerformance, and when we find a product that exemplifies this ideal we can hardly contain ourselves. Enter the Akrapovic exhaust system for the E92 M3 project...

DSC01822 (2).JPG

This all titanium header back exhaust replaces the stock catalytic converters with higher flowing 100 cpsi race versions as well as everything from there on back. The quality of workmanship is evident with every detail, including clean welds:

DSC01823 (2).JPG

Double wall, resonated, fully adjustable tips:

DSC01840 (2).JPG

And solid flanges that mate perfectly to the OEM flange coming off the headers:

DSC01828 (2).JPG

Along with the high flow cats and mufflers, Akrapovic eliminated contortions and twists in the stock exhaust tubing (see below) to clean up the air flow:

DSC01832 (2).JPG

The kit came with the most thorough installation instructions we've ever seen at the shop, including proper torque values for every nut and bolt. This is easily the best exhaust system that we have installed. And it's more than just a well crafted piece of tubing hanging underneath the car, it delivers power and sound.

bmw_m3_e90_e92_e93_evolution.jpg

According to their website: "From approximately 2.500 rpm on, the power increase is about 22 HP. The torque is nearly constant at 35 Nm over the stock. That is the real joy of driving: high speed engine benefits in daily practice due to the torque increase. It improves the agility in the lower rpm-range noticeably. Also, the engine is stronger in the higher rpm-range and the elasticity is improved considerably. The improvement of acoustics played an important role in the development. The Akrapovic exhaust system amplifies and rectifies the beautiful sound of the 8-cylinder motor, without appearing invasive or having disadvantages in the daily use"

All told, the Akrapovic components are 24 kg, or 52.8 lbs lighter than the stock system.

DSC01837 (2).JPG

This exhaust system is expensive, but looking at the materials used the craftsmanship and the performance, we consider the price well worth it.

DSC01851 (2).JPG

And

DSC01850 (2).JPG


Next up, power pulleys...

E92 M3 Project Part 1, Intake

Just as the E46 before it, the E9x series M cars are phenomenal straight from the factory. With a 414 hp V8 under the bulging hood and a sharply tuned suspension keeping things in check, it's hard to beat this sport sedan with even the most dedicated sports car. So what's an enthusiast to do when it comes to sharpening the scalpel the local BMW store delivered him? Turns out, quite a bit...

The beautiful alpine white E92 M3 came to us directly from the dealer with only a few test miles on it. The owner researched the market for months before ordering up a pretty basic M3-- with only the DCT option box ticked. His vision was to tailor the car to his specifications with help from the aftermarket, and your friends at VRPerformance.

Before the car even hit these shores we met with the customer to feel out what he wanted from the end product. It took weeks of research, phone calls, emails and face time to formulate a plan.

Power was definitely on the top of his wish list and so we tackled it first. There are several options to free up horsepower without resorting to forced induction, and we went for all of them. Think of an engine as a giant air pump-- sucking air in through the induction and pumping it into the internals and out the back through the exhaust. Power comes from squeezing and then combusting as much air and fuel as possible. More air in and out, more power.

We used our trusted source for cold air intakes, Advanced FLOW Engineering (aFe), to open the inward air flow up for us.

50-11662B_400.jpg

According to their website, "In recent testing this intake produced an astounding 15hp and 13lbs. x ft. of torque while outflowing the factory intake by 85%. age engineers also tested the on-road intake temperature of this intake compared to the factory intake. The age intake had a lower intake temperature than stock."

Here are a couple of graphs to back up their claims, first the power curves:
50-11662DYNO1600_400.jpg
And the flow chart:
50-11662_400.jpg

Here the unit is installed in the customer's car-- it's a tight fit, but well worth the effort.

dsc01835 (2).jpg

And can't forget the little air scoops behind the kidney grill:

DSC01817 (2).JPG


Next up, we need to get the extra air out...

Powder Room

Brakes go through a whole lot of abuse. We change pads and rotors pretty regularly but often overlook one of the most essential assemblies in the brake system, the calipers. It’s the pistons that reside in the calipers that provide the clamping force on the rotors via the pads that stop the car. And these pistons have o-rings and seals that need to be checked-- especially if you take the car to the track for some-- quite literally-- "hot" laps.

Time, the elements and heat conspire to wear out the o-rings, bushings and dust seals on ordinary brake calipers. When the dust cover fails, road grime seeps into the cylinder and piston and eventually causes corrosion. The piston then sticks, causing the pad to drag on the rotor, which in turns creates too much heat which cause more stress on the system and quickly you get a downward spiral of not good.

If the factory coating on your caliper housing is an ugly rust color, you've probably overheated the caliper at some point.

We've talked about all this before, but it's worth repeating here since we added a bit of bling to the ordinary brake caliper rebuild this time around. Check out the pictures below.

The first step is to take it all apart-- here you see the various bits from the caliper, minus the caliper housing:

DSC01661.JPG

A common upgrade is to swap the rubber guide pin cylinders for brass ones:

DSC01664.JPG

And now for the bling; we sent the caliper housings out for powder coating instead of the usual paint. Powder coating gives a deeper, more durable finish that typically lasts much longer than standard high temperature paint. Expect to pay about double the paint price:

DSC01660.JPG

DSC01658.JPG

The end result installed:

DSC01680.JPG